Create a Security Dimension
Restrict users to accessing only a subset of data in a cube by creating one or more security dimensions. When users run queries against the cube, AtScale uses the security dimension as a runtime constraint. However, the constraint does not appear as part of the query on the AtScale Queries Search page.
About this task
A security dimension consists of the following:
- Security Dimension Dataset: A table or dataset that relates user id's to rows in either dimension or fact datasets.
- Attribute Filter Key Column: The column of the security dataset used to filter either a dimension or fact dataset.
- Column Containing IDs: The column of the security dataset that contains AtScale user/group login ids.
- Scope: Determines what queries the security dimension is applied to. The three values: Related, Fact, and All are described below.
- Lookup Rules: Provides control over the security enforcement
query pattern. Some data warehouses perform better with the "Use
Filter Key" option.
- None: The system will enforce security by joining with the security dimension table.
- Use Filter Key: The system will enforce security by first looking up the Filter Key Column values using the User's id and then use those values as a constraint in a second query against the fact or dimension dataset.
When a user runs a query that conforms to the specified scope setting, the AtScale engine will enforce the security by either adding joins or by performing preliminary lookup queries, depending on the configured Lookup Rule.
-
Security dimensions in projects created before AtScale 7.4 are deprecated and must be deleted and replaced with "scoped" 7.4 security dimensions. The AtScale Design Center will detect deprecated security dimensions and display validation errors to remind the data architect to convert the security dimension. The engine treats deprecated security dimensions as having a scope of "All". The "All" scope query behavior is consistent with the pre-7.4 query behavior.
-
Data access by super users is not restricted by security dimension tables. These users have full access to the data in cubes that are in projects that they are granted access to.
-
Usernames for users that access security dimensions must be in lowercase, unless you configure AtScale to normalize their usernames to lowercase automatically. To enable the automatic normalization of user names, follow these steps:
- Log in to Design Center as an AtScale super user or Organization Administrator
- From the Design Center menu bar (top of page), select SETTINGS > ENGINE.
- Scroll down to the "AUTH.USER.NORMALIZE.LOWERCASE" setting and set to True.
- Restart the engine.
Scope Setting
The scope configuration provides a way to control when AtScale applies security dimension constraints. The scope property has the following settings:
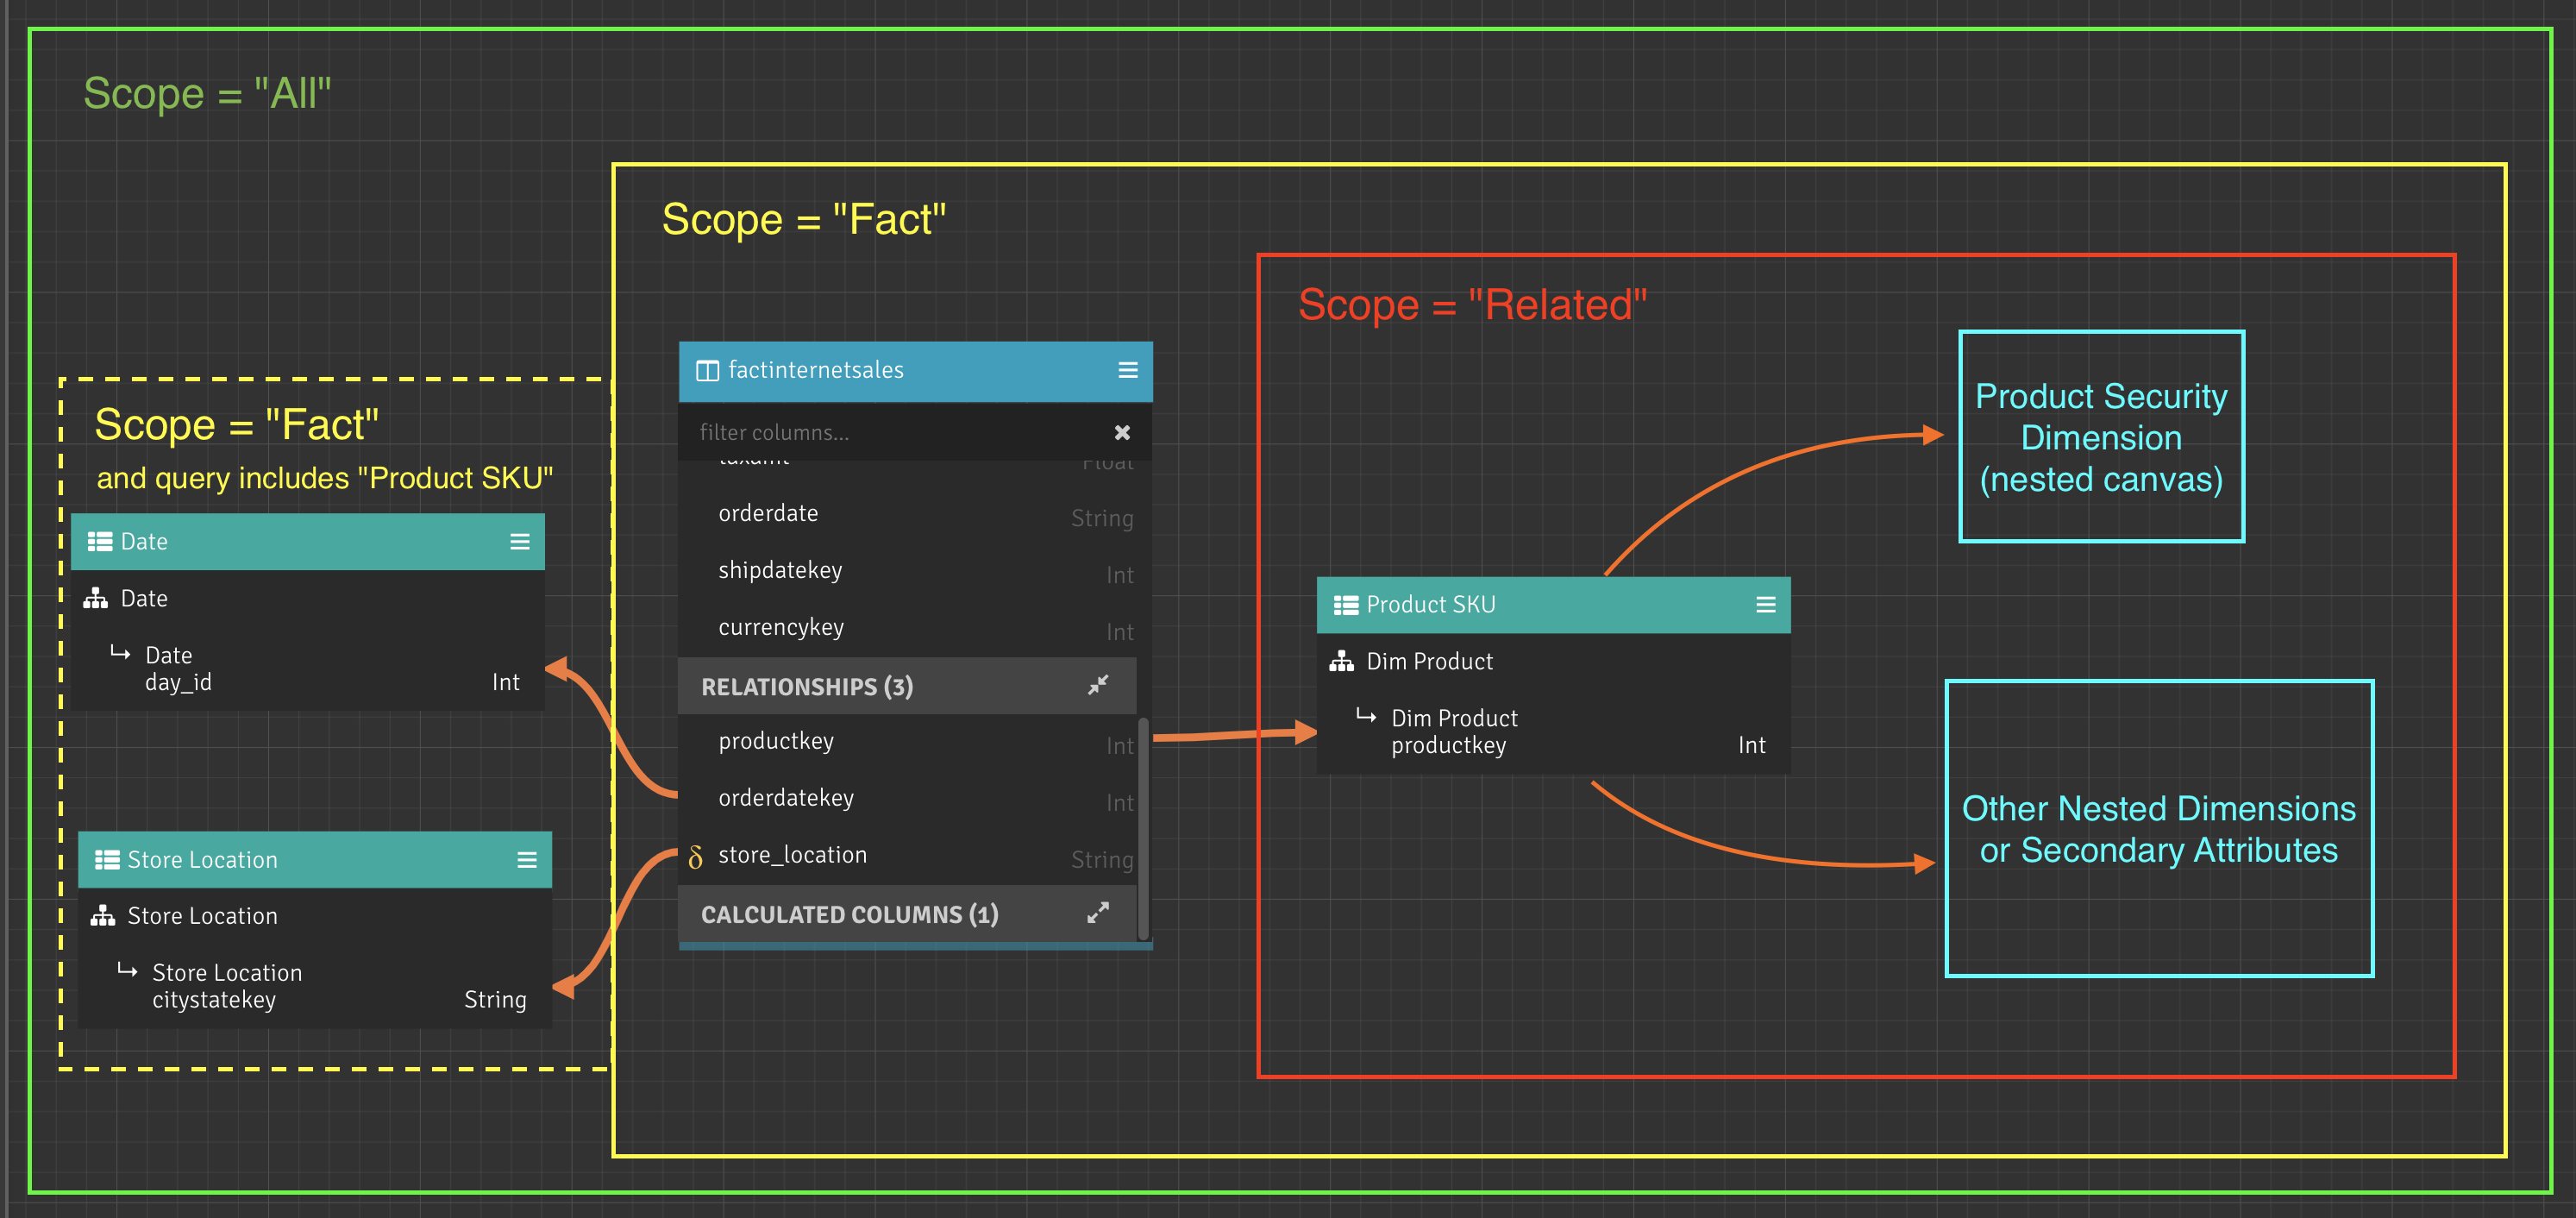
- Related: Applies security constraint when the query selects any dimension or secondary attributes that have a path to the security dimension as long as no fact table is used. The security constraint is not applied to dimension-only queries that select multiple dimensions related through a fact table. See the red box in Figure 1.
- Fact: Applies to the same queries as Related but also applies to queries that include a measure from a fact table connected to the secure dimension (See the yellow box in Figure 1). The security constraint is not applied to single-dimension-only queries that are related to the secured dimension via the fact table (Date and Store Location in Figure 1). However, multi-dimension-only queries will have security applied because they are joined using a synthetic measure from the fact table that relates them (dashed yellow box in Figure 1).
- All: Every query will have the security dimension applied unless there is no path to the security dimension. This is the case with two separate fact tables, each with their own unrelated dimensions. See the green box in Figure 1.
Prior to AtScale 7.4, default security dimension behavior was equivalent to the "All" setting. This behavior was usually desired when querying fact tables, but resulted in unnecessary joins when selecting dimenstion data unrelated to the secured dimension. This problem manifested as degraded performance when rendering filter controls in BI Tools. The scope setting allows data architects to selectively apply security checks, thereby optimizing the performance of dimension-only queries.
Figure 1 illustrates a model consisting of factinternetsales (a fact table), Product SKU (dimension secured by a nested Product Security Dimension), Date (unsecured dimension), and Store Location (unsecured dimension).
Figure 1. Graphic Representation of Security Dimension Query Scopes
Given the model in Figure 1, Table 1 illustrates the application of the Product Security Dimension as either a "Yes" or "No" value for each example query and scope setting on the Product Security Dimension.
Table 1. How Security Dimension Scope Settings Affect Queries on the Figure 1 Model.
| Query selected attributes | Product Security Dim Scope = All | Product Security Dim Scope = Fact | Product Security Dim Scope = Related |
|---|---|---|---|
| Product SKU | Yes | Yes | Yes |
| Product SKU secondary attributes | Yes | Yes | Yes |
| Date | Yes | No | No |
| Store Location | Yes | No | No |
| Date, Store Location | Yes | Yes | No |
| Sum(SalesAmount) | Yes | Yes | No |
| Sum(SalesAmount), Date, Store Location | Yes | Yes | No |
| Sum(SalesAmount), Date, Product SKU | Yes | Yes | Yes |
Notes on Security Dimension Scope
- Degenerate dimensions (dimensions derived from a fact table) behave the same way as standard dimensions with respect to the scope setting of "Fact". Therefore a dimension-only query to a degenerate dimension will not have its contents filtered by a secured dimension connected to the fact table (i.e. Product SKU in Figure 1).
- Security constraints for all scopes does not apply to queries run against unconnected fact datasets, or their dimensions.
Example User-to-Attribute Mapping Table Suitable for a Security Dimension
Suppose that you wanted to set security in the Geography dimension, so that some users only have access to certain regions. For example, user ID hulk.hogan@mycompany.com has access only to United States sales records, while user ID wayne.gretzky@mycompany.com has access to sales in Canada. To create such a mapping table, execute a script similar to the following example directly in the data warehouse.
Script Example 1: Create the user-to-attribute mapping table DDL and DML.
DROP TABLE schema.country_map;

CREATE TABLE schema.country_map (country STRING, username STRING);

INSERT INTO schema.country_map (country, username) VALUES ('Australia', 'paul.hogan@mycompany.com');
INSERT INTO schema.country_map (country, username) VALUES ('Canada', 'wayne.gretzky@mycompany.com');
INSERT INTO schema.country_map (country, username) VALUES ('France', 'brigitte.bardot@mycompany.com');
INSERT INTO schema.country_map (country, username) VALUES ('Germany', 'heidi.klum@mycompany.com');
INSERT INTO schema.country_map (country, username) VALUES ('United Kingdom', 'austin.powers@mycompany.com');
INSERT INTO schema.country_map (country, username) VALUES ('United States', 'hulk.hogan@mycompany.com');
Creating a User-Based Security Dimension
Before you begin, check if the dimension you plan to create the security dimension on has multiple hierarchies. If it has multiple hierarchies, they should share the same leaf level (the most granular level of the hierarchy). This ensures a relationship is automatically established for every hierarchy after you create a security dimension. To check if the hierarchies share a level, open the leaf level (indicated by a leaf icon) of each hierarchy in the dimension and check if the Query Name field is the same for each.
If the hierarchies don't share a level, find one hierarchy's leaf level (indicated by a leaf icon). Click its ellipsis icon and select Duplicate. Duplicate it to each other hierarchy in the dimension. Then delete the old leaf levels from those other hierarchies.
To add a user-based security dimension:
-
Outside the Design Center: Create a security dimension table, aka "user-to-attribute mapping" table, in the data warehouse. All user IDs that run queries against the cube must be included in this table. You can add or remove users to the table at any time by inserting or deleting rows.
-
Inside the Design Center:
- Open your project, open the cube in which you want to create the security dimension, and then open the dimension that you want to create the security dimension on. You cannot connect a security dimension to a degenerate dimension. If you wish to secure a degenerate dimension, connect the security dimension directly to the degenerate dimension's source dataset instead.
- Add the user-to-attribute mapping table as a dataset to your library of datasets.
- In the Library toolbar, click the Add New Security Dimension icon. The Create a Security Dimension window opens.
- Accept the suggested name for the dimension or change it. The suggested name is in this format: <existing dimension> Security
- Optionally, enter a Description for this security dimension.
- In the Dataset field, select the dataset that you created from your mapping table.
- In the Column Containing Attribute Filter Keys field, select the column that you are adding security to.
- For the Lookup Rules field, choose the lookup rule. "None" will perform a join, whereas "Use filter Key" will look up the filter keys separately and use them in the dimension or fact query.
- In the Column Containing IDs field, select the column that contains the user IDs.
- In the ID Type field, select User.
- For the Scope setting, choose the scope of queries that the security dimension should apply to.
- Click Save. The new security dimension appears on the dimension canvas.
- Locate the attribute in the dimensional or fact dataset that you wish to secure and drag the attribute to the security dimension to open the Create a relationship dialog.
- Optionally change the left-hand dataset column, although if you chose the correct column in the previous step the correct column will be preselected for you.
- If you are on a dimension canvas, accept the default option of "Many-to-One"
- Click Save.
The new security dimension appears on the canvas with a relationship connecting the fact or dimension dataset to the security dimension on the secured attribute.
Creating a Group-Based Security Dimension
Before you begin, check if the dimension you plan to create the security dimension on has multiple hierarchies. If it has multiple hierarchies, they should share the same leaf level (the most granular level of the hierarchy). This ensures a relationship is automatically established for every hierarchy after you create a security dimension. To check if the hierarchies share a level, open the leaf level (indicated by a leaf icon) of each hierarchy in the dimension and check if the Query Name field is the same for each.
If the hierarchies don't share a level, find one hierarchy's leaf level (indicated by a leaf icon). Click its ellipsis icon and select Duplicate. Duplicate it to each other hierarchy in the dimension. Then delete the old leaf levels from those other hierarchies.
To add a group-based security dimension, first prepare the groups and the mappings:
-
Outside the Design Center:
- In the data warehouse create a security dimension table; that is, "group-to-attribute mapping" table.
- Include in the table all group IDs associated with the users that run queries against the cube.
-
In the Design Center, go to Security > Groups and create groups that match the group IDs added to the "group-to-attribute mapping" table.
For details, see Creating AtScale Groups.
-
Go to Security > Mappings, and in the Directory Group to Group Mappings section map your Directory Group to the appropriate AtScale Group.
For details, see Granting Runtime Permission on Cubes to Groups of Externally-Authenticated Users.
Now, go to your cube, and add the "group-to-attribute mapping" table as a dataset to your library of datasets:
- In the Library toolbar, click the Add New Security Dimension icon. The Create a Security Dimension window opens.
- Accept the suggested name for the dimension or change it. The suggest name is in this format: <existing dimension> Security
- Optionally, enter a description for the security dimension.
- In the Dataset field, select the dataset that you created from your mapping table.
- In the Column Containing Attribute Filter Keys field, select the column that you are adding security to.
- For the Lookup Rules field, choose the lookup rule. "None" will perform a join, whereas "Use filter Key" will look up the filter keys separately and use them in the dimension or fact query.
- In the Column Containing IDs field, select the column that contains the group ID.
- In the ID Type field, select Group.
- For the Scope setting, choose the scope of queries that the security dimension should apply to.
- Click Save. The new security dimension appears on the dimension canvas.
- Locate the attribute in the dimensional or fact dataset that you wish to secure and drag the attribute to the security dimension to open the Create a relationship dialog.
- Optionally change the left-hand dataset column, although if you chose the correct column in the previous step the correct column will be preselected for you.
- If you are on a dimension canvas, accept the default option of "Many-to-One"
- Click Save.
Editing a Security Dimension
To edit a security dimension you click the security dimension's context menu and choose "Edit". Editing a dataset is subject to the following restrictions:
- You may not change the security dimension's dataset
- Changing column assignments is limited to the two columns originally chosen, allowing you to effectively switch them.
- The Lookup Rules may be changed without restriction.
- The Scope setting may be changed without restriction.
Remove a Security Dimension Relationship from the Dimensional Canvas
Removing a security dimension from a dimensional canvas removes only the dimension's usage of the security dimension. The definition of the security dimension still exists and is available for data modeling. If a security dimension is not connected to a dimension and will not be enforced by the engine.
Remove security dimension usage by removing its relationship:
- Double click on the relationship that links the security dimension to another dataset to open the "Edit a Relationship" dialog.
- Click the "REMOVE" button.
- The system asks for confirmation by displaying "Are you sure you want this to be removed?". Confirm the removal by clicking the "OK" button.
- The definition of the security dimension still exists on the canvas is available for data modeling. If not connected to other datasets, the engine will not enforce the security dimension.
Remove security dimension usage by removing it from the canvas:
- From the Canvas, click on the security dimension's context menu (three line icon in the upper right hand corner).
- Click the "REMOVE" option.
- The system asks for confirmation by displaying "Are you sure you'd like to remove the ABC Dimension from the XYZ Dimension? ". Confirm the removal by clicking the "OK" button.
- The security dimension is removed from the canvas but still exists in the project library for data modeling. If not connected to other datasets, the engine will not enforce the security dimension.
Remove a Security Dimension from a Project
Removing a security dimension from the entire project can be accomplished by:
- Opening the library panel and filtering for the security dimension by name.
- In the libary panel click the security dimension's action menu (three dots icon), and choose Delete.
- Confirm the removal by answering the question, "Are you sure you want to remove the XYZ dimension?" by clicking "OK".
- The syste will remove the definition of the security dimension from the project as well as all uses (aka "relationships") of the security dimension.